Why Your Sourdough Bread Is Not Rising

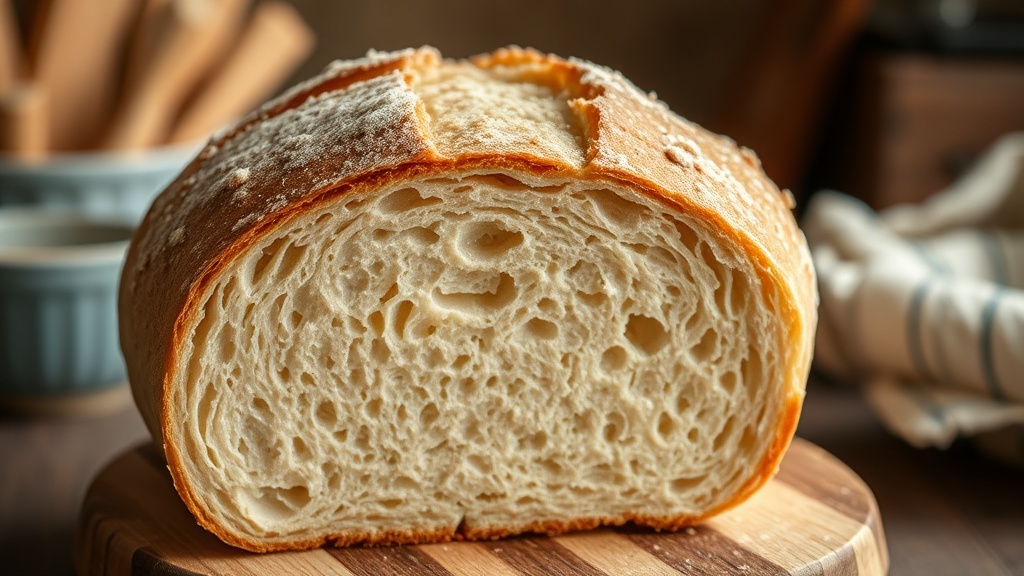
A dense, heavy loaf of sourdough bread sits on a cutting board, looking more like a brick than a light, airy boule. This is the result of a failed rise, a frustrating outcome that often stems from a breakdown in one of several critical variables: temperature, hydration, fermentation timing, or starter strength. This post identifies the specific technical reasons your sourdough isn't expanding and provides actionable solutions to ensure your next loaf has the open crumb and significant oven spring you are looking for.
The Strength and Vitality of Your Starter
The most frequent culprit behind a flat loaf is a weak or inactive starter. Sourdough relies on a symbiotic culture of wild yeast and lactic acid bacteria. If this culture is not at its peak activity when you mix your dough, it will lack the gas-producing power necessary to lift the heavy flour structure. If you find that your starter is sluggish, you should first investigate why your sourdough starter is not bubbling, as a lack of bubbles is a direct indicator of low yeast activity.
To ensure your starter is ready for baking, perform a float test. Drop a teaspoon of your active starter into a glass of room-temperature water; if it sinks, it lacks the carbon dioxide levels required for a significant rise. You must feed your starter with a consistent ratio of flour and water—typically 1:1:1 or 1:2:2—until it consistently doubles or even triples in volume within 4 to 6 hours. Using a high-quality unbleached bread flour or a rye flour can provide more nutrients to the yeast, accelerating this process.
The Role of Flour Protein and Type
Not all flours are created equal when it comes to structural integrity. If you are using a low-protein flour, such as a standard all-purpose flour from a brand like Gold Medal, your dough may lack the gluten strength to hold onto the gases produced during fermentation. Without a strong gluten network, the bubbles will simply escape, resulting in a flat, dense loaf.
For successful sourdough, aim for bread flour with a protein content of at least 12% to 13%. King Arthur Bread Flour is a reliable standard for home bakers because of its consistent protein levels. The protein creates the elastic web that stretches as the yeast produces CO2. If you are incorporating whole grains like whole wheat or spelt, be aware that these act as "gluten cutters." They can weaken the dough structure, so you may need to increase your bulk fermentation time or use a higher percentage of strong white bread flour to compensate.
Temperature Control and Fermentation Timing
Temperature is perhaps the most volatile variable in the sourdough process. Yeast activity is highly temperature-dependent. If your kitchen is too cold, the fermentation will stall; if it is too hot, the dough may over-proof and collapse. The ideal temperature for bulk fermentation is between 75°F and 80°F (24°C to 27°C).
If you are baking in a cooler climate or during winter months, your dough will likely rise much slower than the recipe suggests. You can use a proofing box or even a turned-off oven with the light on to create a warmer environment. However, be cautious: excessive heat can lead to a dough that is overly acidic and structurally weak. If your dough feels "soupy" or lacks any bounce when poked, you have likely over-proofed it due to high temperatures.
Understanding Bulk Fermentation vs. Proofing
Many bakers confuse bulk fermentation with the final proof. Bulk fermentation is the first stage where the dough develops its strength and gas. If you cut this stage short because you are eager to bake, the dough will not have enough internal pressure to rise in the oven. You should look for visible signs of progress: the dough should look aerated, have visible bubbles on the surface, and show a significant increase in volume (usually 50% to 75% increase depending on the recipe).
The final proof—the stage after you shape the loaf—is also critical. If you move the dough to the oven too early (under-proofing), the loaf might have a "burst" of growth followed by a sudden collapse. If you leave it too long (over-proofing), the gluten structure will have degraded so much that it cannot hold any gas at all, leading to a flat loaf. Use the "finger dent test" to check: gently press a finger into the dough. If the indentation springs back slowly and leaves a slight dimple, it is ready. If it springs back instantly, it needs more time. If the indentation stays and the dough feels deflated, it is over-proofed.
Hydration Levels and Dough Strength
Hydration refers to the ratio of water to flour in your recipe. High-hydration doughs (anything above 75% water) are prized for their open, airy crumb, but they are significantly more difficult to manage. If your hydration is too high for your current skill level or your flour's absorption capacity, the dough will become a liquid mess that cannot hold its shape, resulting in a wide, flat loaf rather than a tall, upright one.
To manage high hydration, you must implement strength-building techniques such as "stretch and folds" or "coil folds." Instead of traditional kneading, which can be too aggressive for high-hydration sourdough, perform 4 to 6 sets of folds during the first few hours of bulk fermentation. This builds the gluten strands incrementally. Use a bench scraper to handle the dough, as high-hydration dough is notoriously sticky. Tools like a Jowla or a high-quality silicone spatula are essential for manipulating the dough without losing the incorporated air.
The Importance of Shaping and Tension
The way you shape your loaf determines how much "lift" it can achieve in the oven. If you do not create sufficient surface tension during the final shaping, the gases will expand outward rather than upward. This results in a "pancake" loaf.
When shaping your boule or batard, use your hands to fold the edges toward the center, then flip the dough over and use the friction of the countertop to pull the dough toward you. This tension creates a "skin" on the outside of the dough. If you are using a banneton (proofing basket), ensure it is well-floured with rice flour—which does not absorb as much moisture as wheat flour—to prevent the dough from sticking and losing its shape when you invert it into the Dutch oven.
The Oven Spring Factor
Even with perfect dough, the "oven spring"—the final burst of expansion when the loaf hits the heat—can fail if your baking environment is incorrect. The most effective way to achieve a professional oven spring is by using a Dutch oven. The lid traps the steam released by the dough, which keeps the surface of the loaf moist and extensible for a longer period. This allows the bread to expand fully before the crust hardens.
If you are not using a Dutch oven, you must find a way to introduce steam into your oven. This can be done by placing a cast iron skillet with boiling water on the bottom rack of the oven or by using a specialized baking stone and spraying the oven walls with water. Without steam, the crust will set too quickly, physically preventing the loaf from rising. Additionally, ensure your oven is fully preheated. A common mistake is starting the bake when the oven is only at 400°F when the recipe calls for 450°F. Use an oven thermometer to verify that your baking stone or Dutch oven is truly at the target temperature before the dough goes in.
To summarize, a successful rise is a combination of a healthy, active starter, high-protein flour, controlled fermentation temperatures, and proper structural tension. By troubleshooting these specific areas, you can move from producing dense, flat loaves to consistent, artisanal sourdough bread.